DEADLIFT: Why You're Not Lifting As Much Weight As You Could.
Increase Your Max Lift With These Great Tips!
Deadlift Fundamentals- Beginners Start Here!
The deadlift is an exercise that is equally loved and feared by the masses. For those who have mastered this lift they know that it is great for building overall strength. Those who fear it usually do because they still need a bit of practice when it comes to proper form.
This exercise should fatigue your glutes and hamstrings before your lower back. If you are experiencing pain in your lower back, even when lifting light weight, it may be a form issue that can be easily fixed.
The following four “Deadlift Fundamentals” videos should be watched before you attempt your first deadlift. They will help explain proper form and ensure you have the core strength to perform the exercise. (These videos can be viewed in the player to the right.)
Deadlift Fundamentals- Stabilization (Barbell)
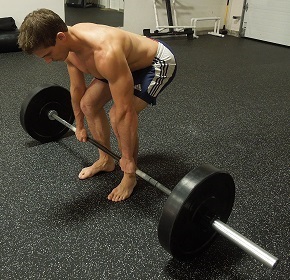
Deadlift Fundamentals- The Set-Up (Barbell)
Deadlift Fundamentals- Foot Stance (Barbell)
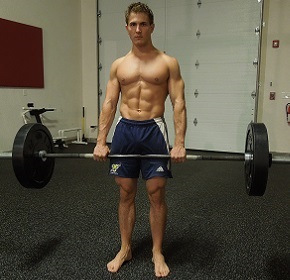
Deadlift Fundamentals- Hip Drive (Barbell)
Final Tips & Tricks to MAXIMIZE your lift!
Believe it or not it may be possible to add five to ten extra reps to your current five rep max just by making a few adjustments to how you approach and lift the barbell. Below we are going to discuss proper footwear, lower back warm-ups, weightlifting belts & your internal belt, proper foot stance, different grip styles, as well as head, shoulder and lower back positioning. It will be a cumulative effort of slightly tweaking each one of these to help you maximize your lift so be sure to apply them all.
Proper Footwear
There are many options when it comes to proper footwear, but which one is right for you? The right shoe will have a significant impact on your workout, so choose wisely!
Running Shoes
- You should never deadlift in shoes that are made with a soft cushion. Your feet are your foundation and they need to be solid if you expect to maximize your lift. The soft cushion creates an unstable foundation which not only creates more distance from your feet to the ground (more distance to lift the barbell), but may cause you to slightly wobble as you perform the lift.
Lifting Shoes
- Lifting shoes are made specifically for lifting. Although they have a raise heel just like a running shoe, the raised heel here is a solid platform and is used to help create more balance when performing lifts such as a “snatch” or “clean & jerk” when your shins are tilted forward. This is because in flat shoes when you step forward you will have to balance yourself with just your toes as you heel naturally rises. The added platform allows you to be on your toes and heal for maximum balance.
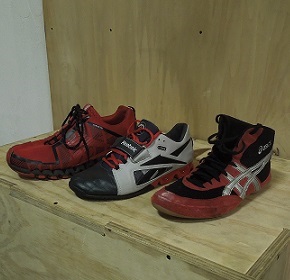
Wrestling Shoes & Barefoot
- Creating the shortest amount of distance for the barbell to travel is key when it comes to maximizing the amount of weight you can lift. Just a few centimeters could mean the difference between adding five to ten pounds to your max lift. Barefoot would be the best option to create the least amount of distance, but if you are unable to lift barefoot in your gym a simple pair of wrestling shoes works great too!
Lower Back Warm-Ups
Before performing any lift that puts a lot of pressure on your lower back you should always take five to ten minutes to warm up. This could be the difference between having an amazing lift or a painful lower back strain.
Here are two quick warm-ups that you can do to help avoid an injury. Perform two sets of twelve reps per exercise before you begin your lift.
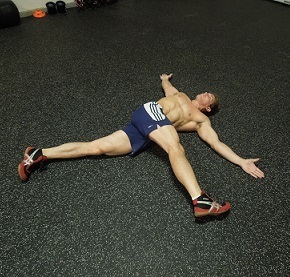
- Alternating Toe-To-Hand Touch (1 - 1 Count): Lay on your back with your arms out by your sides and legs straight. Raise your right leg in the air and while keeping your head facing the ceiling and arms extended rotate your hips and try to touch your toes to your left hand. Return to the middle, lower your right leg followed by raising your left leg and repeat to the opposite side.
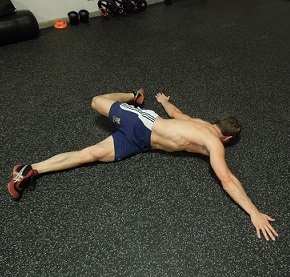
- Alternating Scorpion (1 - 1 Count): Lay face down on your stomach with your arms extended out by your sides and your feet straight. While lifting your right leg in the air simultaneously rotate your hips to the left and try to touch your left hand with your toes. Slowly return to the starting position and repeat with your left leg.
Weightlifting Belt & Internal Belt
Many agree that although you can use a weightlifting belt for the deadlift, you should not use it until you absolutely need it. This is because if you always rely on a belt, you will weaken your core over time. However, whether you choose to use a belt or not the set-up is the same. In order to keep a solid core throughout the entire lift you need to be able to hold air in your diaphragm while simultaneously contracting your core. This is achieved by taking in and holding a short breath while drawing in your stomach and then flexing your abdominals at the same time. Without air in your diaphragm you are not creating enough internal pressure against your transverse abdominis / abdominal wall. It may take some time getting used to this technique, but once mastered you will see just how strong your core really is!
If you do decide that you need the extra support a weightlifting belt should be used and the set-up is basically the same. The only difference is that you would first draw in your stomach as you put on the belt so that you can tighten it as much as possible. From here you are going to still hold a short breath and contract your abdominals, except now you will have the tightness of the belt to push against as you contract your entire core.

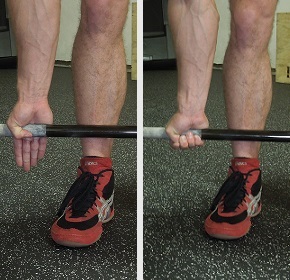
Proper Foot Stance
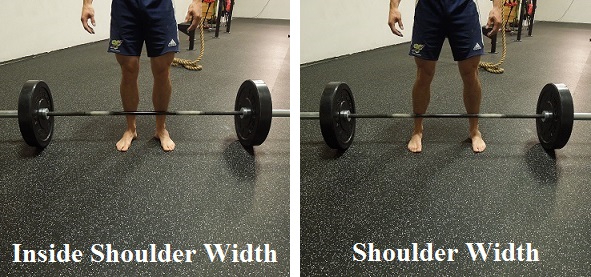
When performing a deadlift you want to make sure that your feet are in a comfortable position so that you can drive through your heels. The feeling should be that you are “pushing the Earth down” with your feet to lift the barbell. Also keep in mind that you need to be able to push your knees out to prevent them from collapsing in and to create more torque in your hips during the lift. This means if your legs are too far apart, you may not be able to grab the barbell properly. Generally, if you stand with your feet about shoulder width or just inside shoulder width apart this is the optimal position to maximize your lift. I personally like to stand just inside shoulder width with my toes slightly pointed out.
Grip Styles
Not being able to hold onto the barbell will have a significant impact on how much you can lift. As you begin to lift more regularly your grip strength will improve, but if you are having trouble there are a few different ways to grab the barbell to make up for weak grip strength.
- Overhand Grip: Place both hands on the barbell with your palms facing your body. Make sure you grab the barbell as tight as you can with your fingers and thumbs around the barbell. This grip is usually the first to let the barbell slip away once you start to lift heavy weight.
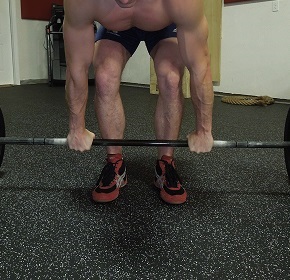
- Switch Grip: Place both hands on the barbell with one hand facing in toward you and the other facing out. Make sure you grab the barbell as tight as you can with your fingers and thumbs around the barbell. This grip is much stronger than the overhand grip because the reverse tension causes the barbell to dig itself deeper into the palms of your hands.

- Hook-Grip: This grip can be applied to both the overhand grip and switch-grip. Once your hands are on the barbell you are going to bend your thumb at a 90 degree angle and then wrap your fingers around the bar and then over your thumb. When using this grip you may feel a lot of pressure on your thumbs.
- Lifting Straps: If you are still having a hard time holding onto the barbell, you can utilize lifting straps to wrap around the barbell once your hands are in place with both the overhand or switch grip.
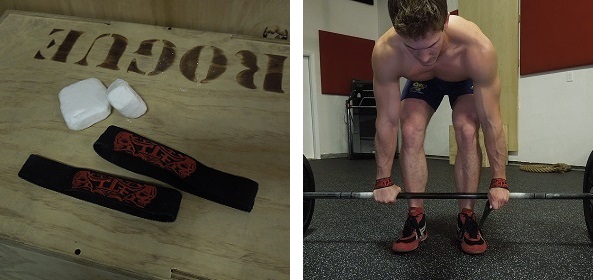
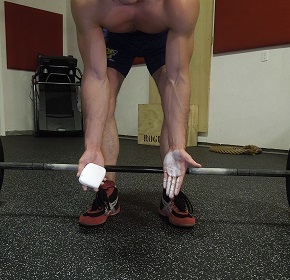
- Chalk: Sweaty hands will always impact your ability to tightly grip the barbell. If you spread chalk on your hands or the barbell it will help to absorb the sweat for a tighter grip.
Head, Shoulder & Lower Back Positioning
Spinal alignment is very important when it comes avoiding an injury when deadlifting. Think of it as having a “kink” in your chain. You want everything to be straight from your head to your hips. Once you are in position with a tight grip on the barbell take a moment to make sure your chin is tucked in, your shoulders are not rolled forward but are neutral as they hang by your sides and that your lower back is not in rounded. The more you take the time to check these three positions before each rep the more natural they will become.
Warm-Up
Now that you have all the tips and tricks you need to maximize your deadlift, begin to do one to two warm-up sets of twelve repetitions with light weight. This will help circulate blood in your body and warm-up the muscles involved in the lift!
Train hard Hermanites! If you happen to break a personal record (PR) be sure to let us know! #HTH